Exchange Online manages all user mailboxes in Office 365. There are possibilities to export Office 365 mailboxes to PST files.
In some cases, you would need to export Office 365 mailbox to PST file. I will share two methods to generate PST files.
Exchange Online is the heart of Microsoft 365. All emails, events and mailboxes are stored in Exchange. Maintaining the mailing system in the Office 365 could require from you whitelisting domains, add external sender warnings or verifying data retention in Exchange.
Every administrator of the Office 365 sooner or later will be asked to export the Exchange mailbox to PST.
Learn how to export Office 365 mailboxes to PST files.
Why you could need PST file?
Microsoft Exchange is the main mailing system in Microsoft 365. Every mailbox could be exported to a PST file.
What is an Outlook PST file?
PST files are used by Outlook to store all data connected with email communication.
An Outlook Data File (.pst) contains your messages and other Outlook items and is saved on your computer. POP accounts—which is a common type of account you can create when adding an email account from an internet service provider (ISP) like Xfinity or AT&T or Cox—download all of your email messages from your mail server and save them on your computer.
In some cases, PST package can be treated as some kind of backup or copy of your mailbox.
When you could need to export Office 365 user mailbox to PST?
There are a few scenarios when your Company needs to export the user mailbox to a PST file:
- migration to a different mailing system without migration tools
- doing offline archive of your Office 365 mailboxes
- generating the copy of the mailbox for the audit purpose
- and more
I expect this is the operation that you will not generate very commonly, but from time to time you will need to export user mailbox to PST file.
I prepared a possible way to simplify the process of exporting the user mailbox.
How to export Office 365 user mailbox to PST using AFI.AI
In the second part of the article, I will present the manual process that needs to be executed for every user mailbox separately. This is a very time-consuming process if you need to export multiple user mailboxes to PST files.
As an alternative, I recommend you set up an Office 365 backup solution AFI.AI. AFI allows you to back up all organization mailboxes and export them with 3 clicks using a user-friendly interface.
AFI.AI is a commercial platform, but you can set up this solution on your Microsoft 365 tenant for free for 4-weeks without any commitment.
Below you will find detailed instructions on how to set up a FREE TRIAL version.
Setuping the backup system will take a few minutes.
Export user mailbox to PST using AFI.AI
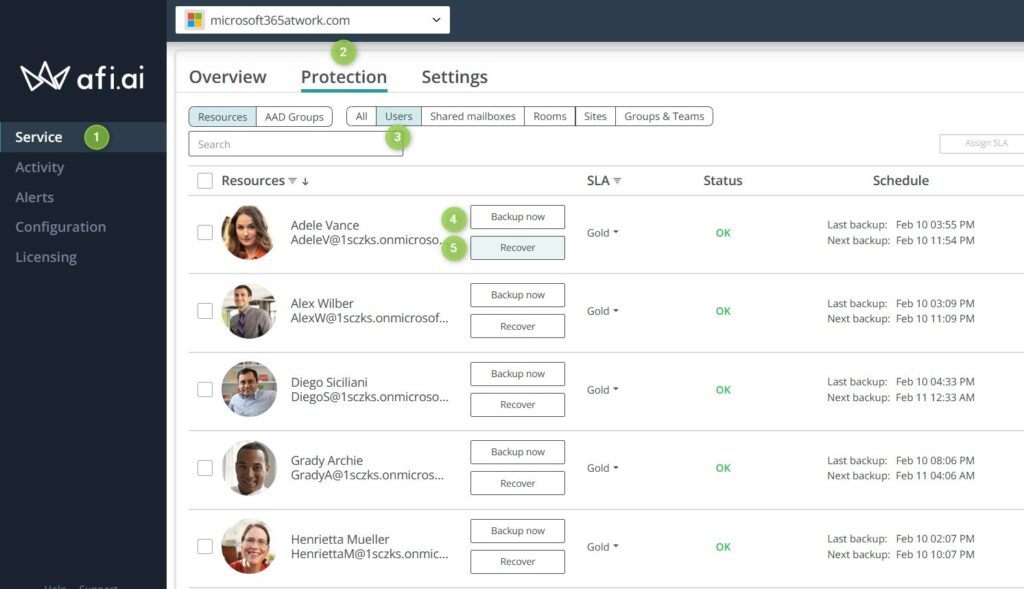
When your AFI.AI application will be available in your Microsoft 365, the only thing you will need to do is to open the AFI.AI app, go to Service (1), Protection (2) and Users (3).
On this screen, you will have a list of all users. Now you need to be sure that the mailbox is backup. To generate additional backup instances select the Backup (4) button.
In the next step, you should select Recover (5). The new pop-up window will allow you to export the whole mailbox into a PST file by selecting the Download button by selecting folders. That’s it!
AFI.AI will also allow you to export Office 365 user mailboxes to other formats: MBOX and EML.
When to use AFI.AI
This very smooth way to export multiple Office 365 mailboxes to PST files. AFI.AI could save you tons of time if this is a very common scenario in your organization.
Moreover, this enterprise-ready reliable backup solution could help you to secure your Office 365 data. Remember you can use this solution for 4 weeks without any commitment for free!
How to export Office 365 user mailbox to PST using eDisovery
Microsoft offers the possibility to export a user mailbox to PST file using native tools but be prepared that this action will require a few steps per each user whose mailbox you would like to export. I would recommend this solution in case you have a single mailbox to be exported to PST.
Grant required permissions to export user mailbox
In the first step, you will need to grant your user the required permission to export mailboxes using eDisovery.
1. Open Compliance Admin Center – Microsoft Purview.
2. Go to Permissions (1) and open Roles (2) in Microsoft Purview solutions.
On the next screen find eDiscovery Manager (1) and on the pop-up windows select the Edit (2) button on the eDiscovery Administrator.
In the next screen, select the option Choose eDiscovery Administrator (1), Add (2) and select your user.
This user will have the possibility to export mailboxes to PST files.
Exporting Office 365 user mailbox to PST file
We get to the process of the exporting user mailbox from Exchange Online to the PST file. You will need to go through multiple steps to generate PST export of the user mailbox.
? I highly recommend to execute this operation using Microsoft Edge. Other browsers will require to install addons.
Now we are starting the generation PST file that will contain exported mailbox of one user.
1. Open the Microsoft Purview admin center at https://compliance.microsoft.com/.
2. Open Content Search (1) section and select New Search (2).
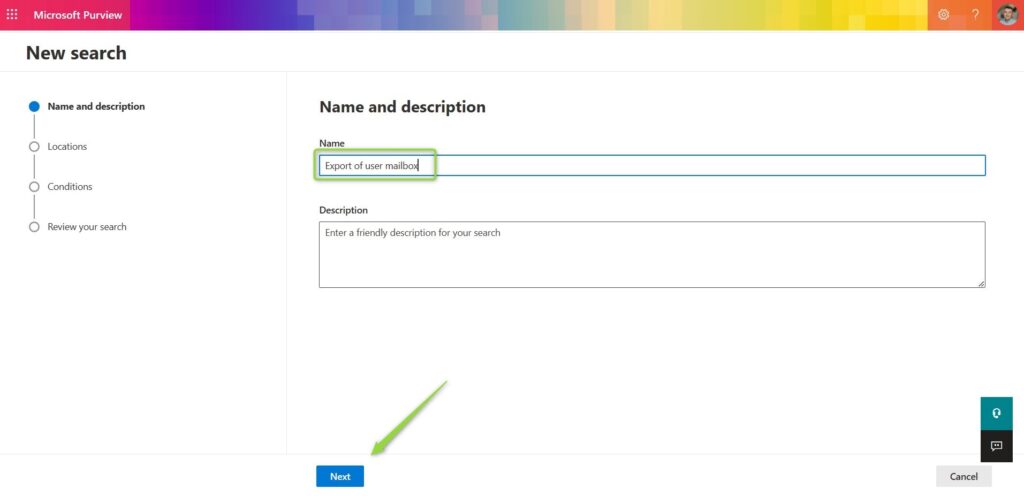
3. You will start the search creator. In the first step set the name and click Next.
4. In the second step, Select Exchange mailboxes (1) and then click on Choose user, groups, or teams (2).
On the pop-up windows select the user and click Done. On the previous screen select Next.
5. In the next step you have to just click Next. We will not try to filter out any data.
6. At the last step of the wizard you need to Submit the search. New search will be created. You can confirm it by clicking on Done button. Assume that the creation of the search could take a few minutes.
7. When the search will be completed you can select the created content search (1), go to Actions (2) and select Export results (3).
In the new pop-up window, you will be able to select which emails you want to export and what the format of PST files should look like. To start the export select the Export button.
8. You started a generation of the PST files that will export the user mailbox. You will need to wait a few minutes before data will be possible to download. When the export will be ready you will be able to download PST file. Go to the Export (1) tab and select created content search export (2).
Then, scroll down and find the section Export key. Use Copy to clipboard (3) button to copy the export key and to download PST file with exported user mailbox click on the Download results (4) button.
9. You will be asked by your browser to open eDiscover Export Tool. Allow it by selecting the Open button. You will be asked to Install the tool.
In the eDiscover Export Tool paste the export key (1), select the file location (2) where PST file should be downloaded and set the PST file name (3). When you are ready select the Start button.
Downloading process of the user mailbox exported to PST file will start.
You can see that process of exporting the user mailbox to PST file is time-consuming, but if this is one time request it should not be a problem.
Errors during eDiscovery export of user mailbox
You can get the error: Client Error: Request failed with status code 500 when you trying export the user mailbox to PST.
Surprisingly this error means that you did not assign eDiscovery Manager role to your user. Go back to Permissions and assign your user the proper role. Wait a few minutes before you will retry the export of the mailbox.
What’s next?
Great! You learned how to export Office 365 mailbox to PST file. Learn how to use retention and backup Exchange, encrypt the email in Microsoft Outlook or delay the email in Outlook.
Do you want more?
I prepared more articles around main Office 365 apps, like Exchange Online, Microsoft Outlook, Microsoft Teams and SharePoint Online.
Conclusion
Learn how to export Office 365 mailbox to PST file. Guideline to export Exchange mailboxes using eDisovery and AFI.AI.


